Starting an ecommerce store? You’ve got products people will love, but if Google can’t find you, they’ll never show up in searches.
In this guide, I’ll share 40 practical Ecommerce SEO steps—broken into bite-sized tips anyone can follow—to get your site visible without any paid tools or technical headaches. We’ll cover keyword research, site structure, on-page tweaks, speed fixes, and even advanced schema. Plus, stick around until the end for a free Excel checklist you can download and tick off as you optimize your own store.
Tip #1: Gather & Organize Your Keywords
Keywords are simply the words your customers type when searching. Here’s how to find and sort them in minutes:
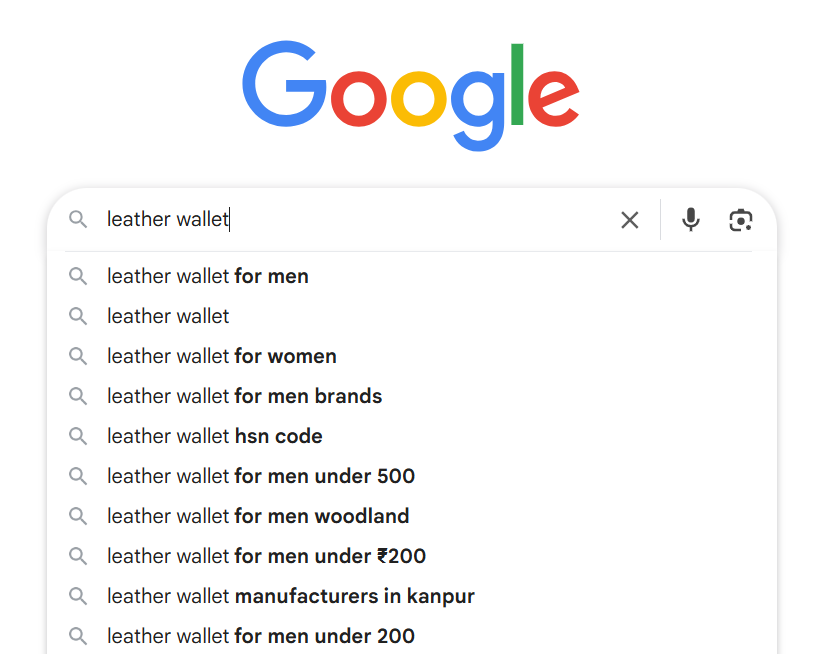
- Collect Real Searches
- Go to Google.com and start typing your main product (e.g., “leather wallet”).
- Write down every autocomplete suggestion you see.
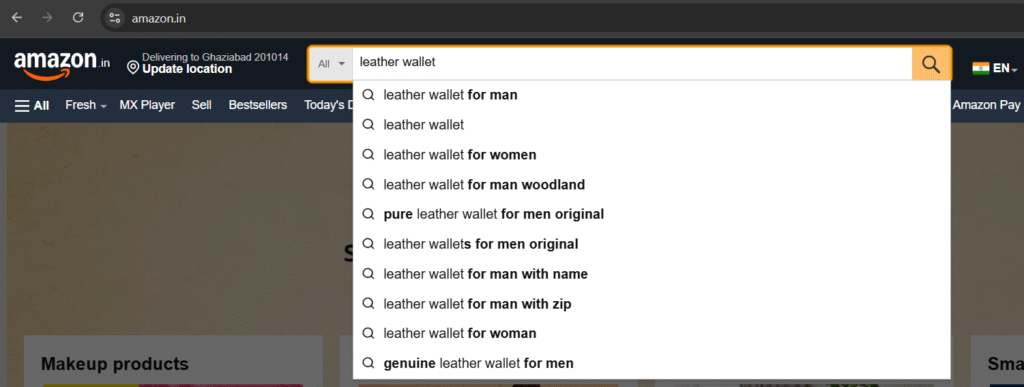
- Repeat on Amazon’s search bar—these are terms real shoppers use.
- Build a Simple Spreadsheet
- Open Google Sheets or Excel.
- Paste each suggestion in one column (no need for extra columns yet).
Why it works: Google and Amazon suggestions come straight from what people actually search. By grouping them by page, you help each part of your site speak directly to what shoppers want—without ever opening a paid tool.
Tip #2: Group Keywords by Page Type
Once you’ve got your list of real-search terms, the next step is to match each keyword with the right page on your site. This makes sure every page talks about exactly what shoppers are looking for.
- Open Your Keyword Sheet
- In the same Google Sheet or Excel file where you pasted your suggestions, add a new column called “Page Type.”
- Decide on Three Buckets
- Homepage: Very broad terms that represent your entire store (e.g., “leather accessories”).
- Category Pages: Mid-level phrases for each section (e.g., “women’s leather wallets”).
- Product Pages: Specific, long-tail searches (e.g., “red slim leather wallet for men”).
- Assign Each Keyword
- Go row by row and pick one of the three buckets for each keyword.
- Example:
- “leather accessories” → Homepage
- “men’s leather wallets” → Category
- “red slim leather wallet for men” → Product
- Filter & Review
- Use the filter tool to see all “Product” terms together—spot any that don’t fit and move them.
- Make sure each group has at least 5–10 good keywords to choose from.
- Apply Your Groups When You Edit Pages
- On your homepage, sprinkle in 1–2 broad keywords in the title or main banner text.
- On each category page, use one mid-tail phrase in the page title (H1) and a couple more in headings or intro text.
- On product pages, put the exact long-tail phrase in the product title, meta description, and URL.
Why it helps: Grouping tells Google exactly what each page is about. When someone searches “men’s leather wallets,” your category page speaks that same language—and shows up in results.
Tip #3: Plan a Simple Site Structure
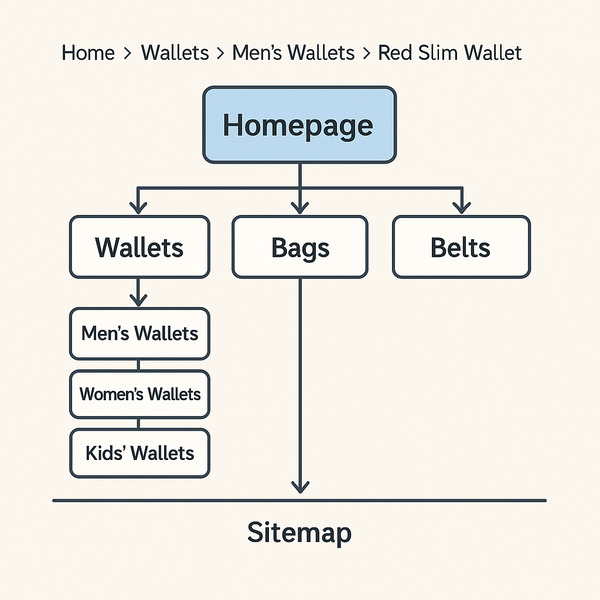
A clean site layout helps visitors find products fast—and helps Google index your pages. Here’s how to set it up in five easy steps:
- List Your Main Categories
- Think of 3–5 big groups that cover all your products (e.g., “Wallets,” “Bags,” “Belts”).
- Write them down in a column of your spreadsheet.
- Add Subcategories
- Under each main category, list 3–6 more specific groups.
- Example under “Wallets”: “Men’s Wallets,” “Women’s Wallets,” “Travel Wallets.”
- Build Your Top Menu
- In your website platform (Shopify, WooCommerce, etc.), create a navigation bar using your main categories.
- Link each menu item to its category page.
- Keep Clicks to 3 or Fewer
- Check that any product page can be reached in no more than three clicks:
- Homepage → 2. Category → 3. Product
- If you need extra levels, fold them into your subcategories or add a “Popular Items” link on the homepage.
- Check that any product page can be reached in no more than three clicks:
- Enable Breadcrumbs
- Turn on a simple text path at the top of pages, e.g.:
Home > Bags > Travel Bags > Waterproof Duffel Bag - Breadcrumbs let shoppers know exactly where they are—and Google reads them too.
- Turn on a simple text path at the top of pages, e.g.:
Quick tip: After building your menu, pretend you’re a customer. Click through to a product—you should never feel lost or click more than three times. If you do, simplify!
Tip #4: Generate & Submit an XML Sitemap
An XML sitemap is like a map of your site that tells Google where every page lives. Once Google has this map, it can find and index your products faster—so they show up in search results.
- Find or Create Your Sitemap File
- Most platforms auto-generate it. Try navigating to:
yoursite.com/sitemap.xml
or
yoursite.com/sitemap_index.xml- If you don’t see one, install a free plugin or use an online generator:
- WordPress: Yoast SEO creates a sitemap automatically
- Online tool: Go to xml-sitemaps.com, enter your URL, and download the file.
- Check Your Sitemap
- Open the sitemap URL in your browser—you should see a list of links to your pages.
- Make sure it includes all your main category and product pages.
- Submit in Google Search Console
- Log in at search.google.com/search-console.
- Select your website property on the left menu.
- Click Sitemaps under “Index.”
- In the “Add a new sitemap” box, enter
sitemap.xml(or the full URL if needed) and hit Submit.
- Verify Submission
- Refresh the Sitemaps page—Google will show a “Success” message when it reads your file.
- If there are errors, it will list them—fix any broken links or typos in your sitemap and resubmit.
Why it matters: Without a sitemap, Google might miss pages—especially deep ones. This quick step ensures every product and category gets on Google’s radar, boosting your chance to appear in search.
Tip #5: Noindex Low-Value Pages
Some pages don’t help you get buyers and only clutter Google’s index. Use a noindex tag to keep these out of search results, so Google focuses on your important pages.
- Identify Pages to Noindex
- Thank-you/confirmation pages after checkout
- Cart or login pages (customers don’t search for these)
- Empty category pages with no products
- Filtered or sorted listing pages (e.g.
?sort=price)
- Add the Noindex Meta Tag
- In the
<head>of each page’s HTML, insert: htmlCopyEdit<meta name="robots" content="noindex,follow"> - “noindex” tells Google not to show the page.
- “follow” lets Google still crawl links on that page .
- In the
- Use Your CMS or Plugin
- WordPress (Yoast SEO):
- Edit the page → scroll to Yoast’s Advanced tab → set Allow search engines to show this Page in search results? to No.
- Shopify:
- In the page editor, click Edit website SEO → check Hide this page from search engines.
- WordPress (Yoast SEO):
- Verify in Google Search Console
- Go to URL Inspection, paste the page URL, and check Coverage → it should say “Excluded by ‘noindex’ tag.”
- If not, clear your cache or re-upload the template and re-test.
Quick reminder: Only noindex pages that add no value to searchers. Keep product, category, and content pages indexable so Google sends shoppers right where they want to go.
Tip #6: Create Clean, Keyword-Friendly URLs
Your page URL is one of the first things Google (and shoppers) see—so make it clear, simple, and packed with the keyword you want to rank for. Here’s how:
- Use only lowercase letters and hyphens
- Example:
example.com/red-leather-wallet - Why: Hyphens separate words in URLs; lowercase avoids errors on some servers.
- Example:
- Keep it short (3–5 words max)
- Aim for a quick phrase, not a full sentence.
- Long URLs can get cut off in search results or look spammy.
- Include your primary keyword
- If your product is a “red slim leather wallet,” your URL could be:
example.com/red-slim-leather-wallet - Why: Google reads the URL to understand your page’s topic.
- If your product is a “red slim leather wallet,” your URL could be:
- Remove stop-words and numbers
- Drop “and,” “the,” “of,” or internal IDs like “1234.”
- So instead of
/the-best-leather-wallet-2025, use/best-leather-wallet.
- Edit URLs in your CMS
- Shopify:
- In the product editor, scroll to Search engine listing → click Edit website SEO → change the URL handle.
- WordPress (WooCommerce):
- Go to Products → hover your product → click Quick Edit → update the Slug.
- Other platforms: look for “URL slug” or “permalink” settings.
- Shopify:
- Set up 301 redirects after changes
- Whenever you change an existing URL, create a 301 redirect from the old URL to the new one.
- This keeps any links you’ve earned intact and avoids “page not found” errors.
Quick tip: After you publish, paste the full URL into your browser—and into Google Search Console’s URL inspection—to confirm it’s live, clean, and error-free. A tidy URL is an easy win that pays off in better rankings and more clicks.
Tip #7: Optimize Title Tags
Your title tag is the headline that appears in Google’s results—and it’s often the very first thing a shopper sees. A clear, focused title tag helps Google understand your page and encourages clicks.
- Locate Your Title Tag Field
- Shopify: In your product or page editor, scroll to Search engine listing → click Edit website SEO → change Page title.
- WordPress (Yoast SEO): Open the page/product, scroll to Yoast’s SEO section, and edit the SEO title.
- Other platforms: Look for “SEO,” “Meta,” or “Page Settings.”
- Keep It Under 60 Characters
- Google cuts off anything longer, so aim for 50–60 characters total.
- Count letters and spaces—tools like character-counter.online can help.
- Front-Load Your Primary Keyword
- Put the most important search term at the start of the title.
- Example:
- Good: “Red Slim Leather Wallet – Best Prices & Free Shipping”
- Not as good: “Shop Now: Best Prices & Free Shipping on Red Slim Leather Wallet”
- Make Each Title Unique
- No two pages should share the same title.
- For category pages add the category name (e.g., “Men’s Leather Wallets”).
- For product pages include the exact product name or model.
- Add a Short Benefit or Brand Name (If Space Allows)
- If you have room after your keyword, include a quick advantage or your brand.
- Example: “Red Slim Leather Wallet | Lifetime Warranty” or “Red Slim Leather Wallet – UrbanStyle Co.”
- Preview & Test
- Paste your title into the Google SERP Snippet Preview tool (many SEO plugins have this) to see how it looks.
- Confirm it doesn’t get cut off and reads naturally.
Why this matters: A well-crafted title tag tells both Google and shoppers exactly what they’ll find on your page—and makes them more likely to click. Keeping it concise, keyword-focused, and unique is a simple change that can boost your rankings and sales.
Tip #8: Write Unique Meta Descriptions
A meta description is the short blurb under your title in Google’s results. A clear, inviting description helps shoppers know what to expect—and can boost your click-through rates.
- Find the Meta Description Field
- Shopify: In your product/page editor → Search engine listing → Edit website SEO → Meta description.
- WordPress (Yoast SEO): Scroll to the Snippet Editor in the Yoast box and enter your description.
- Other platforms: Look for “Meta description,” “SEO,” or “Page Settings.”
- Keep It Between 100–155 Characters
- Any longer, and Google will cut it off with “…”
- Count spaces and letters—aim for around 120–140 to stay safe on mobile and desktop.
- Include One Primary Keyword Naturally
- Use the main phrase you want this page to rank for, but don’t force it.
- Example: “Discover our red slim leather wallet, crafted for style and durability. Free shipping on all orders!”
- Add a Benefit or Call-to-Action
- Give shoppers a reason to click: “Free shipping,” “20% off today,” or “Limited stock.”
- Keep the tone friendly: use words like “discover,” “grab,” or “shop.”
- Make Every Description Unique
- Never reuse the same text on multiple pages.
- Customize for each category or product so Google knows they’re different.
- Avoid Keyword Stuffing
- One clear mention of your keyword is enough.
- Too many keywords makes it sound robotic and can hurt your click rate.
- Preview Your Snippet
- Use your CMS’s built-in preview or an online “SERP Snippet” tool.
- Ensure nothing’s cut off and it reads smoothly.
Why it helps: A well-written meta description acts like a mini-ad for each page. Shoppers get a quick snapshot of what’s inside—and you get more clicks without spending a rupee on ads.
Tip #9: Use Clear Headings
Headings break up your content so it’s easy to skim—and they tell Google what each section is about. Here’s how to add them in just minutes:
- Pick One H1 per Page
- The H1 is your main page title (not your browser tab title).
- Make it clear and include your primary keyword.
- Example for a product page: html
<h1>Red Slim Leather Wallet for Men</h1>
- Use H2s for Major Sections
- Think of H2s as chapter titles.
- On a product page, you might have:
<h2>Features & Benefits</h2><h2>Customer Reviews</h2><h2>Shipping & Returns</h2>
- Add H3s for Subpoints
- If you list multiple features under “Features & Benefits,” use H3s to label each one:
<h3>High-Quality Leather</h3> <h3>Compact Slim Design</h3>
- If you list multiple features under “Features & Benefits,” use H3s to label each one:
- Set Headings in Your Editor
- Shopify: In the text toolbar, highlight your text and choose “Heading 1,” “Heading 2,” etc.
- WordPress (Block Editor): Click the text block, then select the heading level from the dropdown.
- Other Platforms: Look for a “Format” or “Style” menu and pick “H1,” “H2,” etc.
- Keep Them Short & Descriptive
- Aim for 3–6 words per heading—enough to explain the section at a glance.
- Avoid filler words like “Introduction” or “Conclusion”; use specific labels like “How It Helps You.”
- Preview for Readability
- After adding your headings, skim the page as a visitor: you should get the main points just by reading the headings.
- If a section feels too long, break it with another H2 or H3.
Quick reminder: Good headings guide both people and search engines. They turn a wall of text into a clear roadmap—making it more likely shoppers stay, read, and buy.
Tip #10: Craft Unique Product Descriptions
A product description is your chance to sell—so make it clear, friendly, and benefit-focused. Here’s how a beginner can write one from scratch:
- Start with a Short, Clear Intro
- Write one sentence that names the product and its main benefit.
- Example: “Meet the Red Slim Leather Wallet—designed to keep your cards safe without the bulk.”
- List Key Features in Bullets
- Use 3–5 simple bullet points:
- Material: “Genuine cowhide leather”
- Size: “9 cm × 11 cm—fits front or back pocket”
- Pockets: “6 card slots + 1 ID window”
- Extras: “Built-in RFID protection”
- Use 3–5 simple bullet points:
- Explain Why It Matters
- After each feature, add 2–3 words on the benefit:
- Genuine cowhide leather → “for lasting style”
- Fits front or back pocket → “no clunky feel”
- Built-in RFID protection → “keeps data secure”
- After each feature, add 2–3 words on the benefit:
- Sprinkle In Your Long-Tail Keyword Naturally
- Without forcing it, use your exact phrase once or twice.
- Example: “This red slim leather wallet for men is perfect for everyday use…”
- Keep It Human & Conversational
- Write as if you’re talking to a friend: use “you” and “your.”
- Avoid over-technical jargon—think simple words like “lasts long,” “fits easily.”
- End with a Quick Call-to-Action
- Invite them to buy or learn more: “Grab yours today and enjoy free shipping!”
Why it works: Unique, benefit-driven descriptions tell shoppers exactly what they get and why it matters—so they’re more likely to hit “Add to Cart” and boost your Google rankings at the same time.
Tip #11: Optimize Image Filenames & Alt Text
Good images help your pages load faster and make your products more findable. Here’s how to tweak them in 3 easy steps:
- Rename Your Image Files
- Before you upload, change names like
IMG_1234.jpgto something clear:- Example:
red-slim-leather-wallet.jpg
- Example:
- Use only lowercase letters, hyphens between words, and no special characters.
- Before you upload, change names like
- Write Useful Alt Text
- Alt text is a short description that shows if the image can’t load—and it helps Google “see” your photo.
- Keep it under 125 characters and include your keyword naturally:
- Example:
Red slim leather wallet with six card slots
- Example:
- Avoid “image of” or stuffing extra keywords.
- Update in Your CMS
- Shopify:
- Go to Products → click your product → open Media.
- Click the three dots on an image → choose Edit Alt Text → paste your description.
- WordPress (WooCommerce):
- In the Media Library, click your image → fill in the Alternative Text box.
- Other Platforms: Look for an “alt” or “description” field when you upload images.
- Shopify:
Why it matters: Clear filenames keep your files organized, and good alt text boosts your SEO while improving accessibility—so everyone (and every search engine) knows what your image shows.
Tip #12: Compress Images for Speed
Large image files can slow your site down—so compressing them is an easy win. Here’s how any beginner can do it:
- Pick a Free Compression Tool
- TinyPNG (tinypng.com) or Squoosh (squoosh.app) work great and don’t cost a rupee.
- Upload Your Images
- Drag and drop your photos (JPGs, PNGs) into the tool’s webpage.
- Download the Compressed Versions
- The tool will shrink file sizes by 50–80% while keeping quality high.
- Click “Download” or “Save” to get the optimized files.
- Replace Images on Your Site
- In Shopify/WooCommerce/WordPress, delete the old large file and upload the new compressed one.
- Keep the same filename if possible so you don’t break links.
- Check Your Page Speed
- Run your page through Google PageSpeed Insights or GTmetrix—you should see faster load times.
- Aim for under 2 seconds load on both desktop and mobile.
Why it’s worth it: Faster pages keep shoppers happy and signal Google that your site is high-quality—giving you a boost in rankings.
Tip #13: Add Product & BreadcrumbList Structured Data
Structured data is a bit of code that tells Google exactly what each page is about, so you can get rich snippets (price, stars, breadcrumbs) in search results. Here’s how to add it in two easy parts:
A. Product Schema
- Use a JSON-LD Template
Copy this snippet and paste it into the<head>(or just before</body>) of your product page template:
<script type="application/ld+json">
{
  "@context": "https://schema.org/",
  "@type": "Product",
  "name": "Red Slim Leather Wallet for Men",
  "image": [
    "https://example.com/images/red-slim-leather-wallet.jpg"
  ],
  "description": "Slim leather wallet with 6 card slots and RFID protection.",
  "sku": "RSW-1234",
  "brand": {
    "@type": "Brand",
    "name": "UrbanStyle Co."
  },
  "offers": {
    "@type": "Offer",
    "url": "https://example.com/red-slim-leather-wallet",
    "priceCurrency": "INR",
    "price": "1299.00",
    "availability": "https://schema.org/InStock"
  }
}
</script>
2. Customize Your Details
- name: Your exact product name.
- image: URL of your main product image.
- description: One-sentence benefit-driven summary.
- sku: Your stock-keeping code (or leave it out if you don’t use SKUs).
- brand: Your store or brand name.
- offers: Make sure
priceCurrencyandpricematch your site data, andavailabilityis eitherInStockorOutOfStock.
Test It
- Go to Google’s Rich Results Test: https://search.google.com/test/rich-results
- Paste your page URL or the code snippet to confirm Google sees your Product data.
B. BreadcrumbList Schema
- Copy This JSON-LD Snippet
Paste it right after your Product code:
<script type="application/ld+json">
{
  "@context": "https://schema.org",
  "@type": "BreadcrumbList",
  "itemListElement": [
    {
      "@type": "ListItem",
      "position": 1,
      "name": "Home",
      "item": "https://example.com/"
    },
    {
      "@type": "ListItem",
      "position": 2,
      "name": "Wallets",
      "item": "https://example.com/wallets"
    },
    {
      "@type": "ListItem",
      "position": 3,
      "name": "Men’s Wallets",
      "item": "https://example.com/wallets/mens"
    }
  ]
}
</script>
- Adjust for Your Site
- position: The order from the homepage (1) down to the current page.
- name: The visible label in your breadcrumbs menu.
- item: The full URL of each breadcrumb link.
- Verify in Rich Results Test
- Use the same tool to check that Google picks up your breadcrumbs.
Why this matters: Adding these snippets helps Google show price, availability, star ratings, and clickable breadcrumbs in search results—making your listings more eye-catching and trustworthy, and driving more clicks without extra ad spend.
Tip #14: Include a Small FAQ Section
Adding a quick FAQ helps shoppers get answers fast—and it can earn you rich snippets in Google. Here’s how any beginner can add one:
- Pick 3–5 Real Questions
- Check customer emails, chat logs or comments for the top things people ask.
- Example questions for a wallet store:
- “Is this wallet RFID-protected?”
- “Will it fit in my front pocket?”
- “What’s the return policy?”
- Write Short, Clear Answers
- Keep each answer to 1–2 sentences.
- Directly solve the question—avoid extra fluff.
- Example:
Q: Is this wallet RFID-protected?
A: Yes, it has a built-in RFID-blocking layer to keep your cards safe from wireless skimming.
3. Place Under an “FAQs” Heading
- On product or category pages, add:
<h2>Frequently Asked Questions</h2>
<dl>
  <dt>Is this wallet RFID-protected?</dt>
  <dd>Yes, it has…</dd>
  <!-- repeat for each Q/A -->
</dl>- Position it near the bottom—after features but before related products.
4. Add FAQPage Structured Data (Optional but Powerful)
- If your platform supports JSON-LD (or via a plugin), wrap your questions and answers in FAQPage schema so Google can show them directly in search.
- Basic JSON-LD example: htmlCopyEdit
<script type="application/ld+json">
{
  "@context": "https://schema.org",
  "@type": "FAQPage",
  "mainEntity": [
    {
      "@type": "Question",
      "name": "Is this wallet RFID-protected?",
      "acceptedAnswer": {
        "@type": "Answer",
        "text": "Yes, it has a built-in RFID-blocking layer to keep your cards safe from wireless skimming."
      }
    }
    // Repeat for each Q/A
  ]
}
</script>
Why it helps: FAQs clear up doubts, keep people from leaving your page to search elsewhere, add more keyword-rich content, and can earn you eye-catching rich results—all without complicated setup.
Tip #15: Submit Your Product Feed to Merchant Center
Getting your products into Google Shopping (and other Google surfaces) is as simple as sharing a spreadsheet with Google. Follow these steps:
- Create & Verify Your Merchant Center Account
- Go to merchant.google.com and sign in with your Google account.
- In Business information, enter your store name and country.
- Under Settings → Business information → Website, add your store URL, then click Claim URL.
- Verify ownership in Google Search Console if you haven’t already.
- Set Up Shipping & Tax
- In Merchant Center, go to Tools → Shipping and returns, click + to add a shipping service (e.g., standard delivery, free shipping).
- Under Tools → Tax, enter tax rates for customers in India (or your region).
- Create Your First Feed
- Navigate to Products → Feeds, then click +.
- Choose your target country (India) and language (English).
- Pick Primary feed.
- Choose a Feed Method
- Google Sheets: Easiest for beginners.
- Select Google Sheets, then Copy a template to your Drive.
- Fill in columns like
id,title,description,link,image_link,price,availability,brand. - Back in Merchant Center, link your sheet and set a schedule (daily is fine).
- Scheduled Fetch or Upload: If you have a CSV/XML file, upload it or point Google to fetch it.
- Google Sheets: Easiest for beginners.
- Fill Required Fields
- At minimum include:
id: Unique product codetitle: Exact product namelink: Product page URLimage_link: Main image URLprice¤cy(e.g.,1299 INR)availability(in stock/out of stock)
- Add extras like
sale_price,brand,gtinfor better performance.
- At minimum include:
- Submit & Review
- After you save, click Fetch now (if using Sheets) or Upload.
- Check the Diagnostics page for errors or warnings—fix any missing or incorrect data.
- Once approved, your products will start appearing in Google Shopping, Lens, and other surfaces.
Why it matters: A well-formatted product feed lets Google automatically show your products with images, prices, and availability—driving free, high-intent shoppers straight to your store.
Tip #16: Enable On-Site Customer Reviews
Real shopper opinions build trust—and Google loves fresh, unique content. Here’s how to get reviews rolling on your product pages:
- Pick Your Review Tool
- Shopify: Use a free app like Judge.me or Yotpo.
- WooCommerce/WordPress: Enable built-in reviews under Settings → Products → Enable reviews, or install a plugin like “Customer Reviews for WooCommerce.”
- Turn Reviews On
- In your app or settings, switch on “Allow customers to leave reviews.”
- Decide if you want manual approval (recommended so you can filter spam).
- Display Reviews Prominently
- On each product page, show the average star rating at the top.
- List individual reviews below your description—include name, date, rating, and comment.
- Ask for Feedback
- After someone buys, send a friendly email 3–5 days later asking for a review.
- Keep it short: “Hi [Name], thanks for your order! Can you spare a minute to rate your [Product]? Your feedback helps us improve.”
- Add Review Schema Markup
- Let Google show stars in search results by adding this snippet in your
<head>(replace with your data):
- Let Google show stars in search results by adding this snippet in your
<script type="application/ld+json">
{
  "@context": "https://schema.org",
  "@type": "Product",
  "name": "Red Slim Leather Wallet",
  "aggregateRating": {
    "@type": "AggregateRating",
    "ratingValue": "4.5",
    "reviewCount": "24"
  }
}
</script>
- Test it in Google’s Rich Results Test to confirm stars appear.
- Respond & Moderate
- Thank reviewers for positive feedback.
- Politely address any issues in negative reviews to show you care.
Why it works: Reviews give shoppers real proof your product delivers—and each new comment adds fresh content for Google to index, boosting your SEO without extra work.
Tip #17: Link Internally with Clear Anchor Text
Connecting your own pages helps both shoppers and Google find related products and information. Here’s how to do it in a few simple steps:
- Pick Your Key Pages
- Choose important pages you want to boost:
- Top-selling product pages
- Major category pages
- Helpful blog or guide pages
- Choose important pages you want to boost:
- Find Natural Link Spots
- In product descriptions, mention related items:
- “Looking for a matching belt? Check out our black leather belts.”
- In blog posts, point to products or categories:
- “Our guide to choosing the best wallet pairs well with our men’s leather wallets collection.”
- In product descriptions, mention related items:
- Use Descriptive Anchor Text
- Avoid “click here” or “read more.”
- Instead, use clear text that tells readers (and Google) what’s on the other side:
- Good: “women’s travel bags”, “RFID-blocking wallets”
- Not as good: “this link”, “details”
- Add Links in Your Editor
- Shopify/WooCommerce/WordPress:
- Highlight the anchor text.
- Click the link icon.
- Paste or search for the target page URL.
- Hit “Insert” or “Apply.”
- Shopify/WooCommerce/WordPress:
- Check Your Work
- Click each link on your live page to confirm it goes to the right spot.
- Don’t overdo it—aim for 2–5 internal links per page so it feels natural.
Why it matters: Clear internal links guide your visitors to more products and help Google understand which pages are most important—boosting both user experience and your SEO.
Tip #18: Prevent Duplicate Content
If two or more pages say almost the same thing, Google can get confused and split your SEO “points.” Here’s how to fix it simply:
- Spot Duplicate Pages
- In Google, type:
site:yourdomain.com "exact product name or description"- If you see more than one result with the same text, you’ve got duplicates.
- Point Google to the Main Page (Canonical Tag)
- Add this code in the of your main page template (or product page):
<link rel="canonical" href="https://yourdomain.com/your-main-product-url" />- WordPress/Yoast: Edit the page → Yoast’s Advanced tab → paste your main URL into Canonical URL.
- Shopify: Most themes add this automatically. To check, view your page source and look for
<link rel="canonical">. If it’s missing, you can edit theme.liquid under “Online Store → Themes → Edit code.”
- Hide Extra Copies (Noindex Tag)
- For pages you don’t want in search (print versions, heavily filtered lists), add in the
<head>:
- For pages you don’t want in search (print versions, heavily filtered lists), add in the
<meta name="robots" content="noindex,follow">- This tells Google: “Don’t show this page, but do follow its links.”
- Merge or Redirect Similar Pages
- If two pages cover the same product/topic, pick the stronger one.
- On the weaker page, set up a 301 redirect to the main page (so users and Google go straight there).
Why it helps: Consolidating content means all your ranking power goes to one page—making it stronger in Google’s eyes and easier for shoppers to find.
Tip #19: Ensure Mobile-Friendliness
Most shoppers browse on their phones—so your site must look and work great on mobile. Here’s how to check and fix it in simple steps:
- Run Google’s Mobile-Friendly Test
- Go to https://search.google.com/test/mobile-friendly
- Enter any page URL and click “Test URL.”
- If it flags issues, note them down (e.g., text too small, clickable elements too close).
- Choose a Responsive Theme
- Shopify: In Online Store → Themes, pick one labelled “Responsive.”
- WordPress: Under Appearance → Themes, filter for mobile-friendly or responsive themes.
- Responsive means the design adapts to any screen size automatically.
- Check Button & Text Sizes
- On your phone, open a page and try tapping links and buttons.
- Touch targets should be at least 40×40 pixels (about the size of your fingertip).
- Text should be legible without zooming—aim for at least 16 px font.
- Use the Viewport Meta Tag
- In your theme’s
<head>, ensure you have:
- In your theme’s
<meta name="viewport" content="width=device-width, initial-scale=1">- This tells browsers to scale your pages correctly on all devices.
- Test Manually on Real Devices
- Open your store on at least one Android phone and one iPhone.
- Click through menus, scroll pages, and use the cart—make sure nothing breaks or feels awkward.
Why it matters: Google uses mobile-first indexing—if your site isn’t mobile-friendly, your rankings can drop. Plus, frustrated phone users will leave quickly, costing you sales. Ensuring mobile-friendliness keeps both Google and your customers happy.
Tip #20: Boost Page-Load Speed
Fast pages keep shoppers happy—and Google rewards quick sites with better rankings. Here’s how to speed up in a few easy steps:
- Run a Speed Test
- Go to Google PageSpeed Insights (pagespeed.web.dev) and enter your URL.
- Note the top suggestions (e.g., “Eliminate render-blocking resources,” “Serve images in next-gen formats”).
- Compress & Resize Images
- Use TinyPNG or Squoosh (we covered this in Tip #12).
- Make sure you’re only uploading the dimensions you need—no huge images scaled down in the browser.
- Enable Lazy Loading
- Lazy loading loads images only when they scroll into view.
- Shopify: Many themes have a “lazy load” toggle under theme settings.
- WordPress: Use a free plugin like a3 Lazy Load.
- Minify Your CSS & JavaScript
- Minifying means removing extra spaces and comments so files are smaller.
- WordPress: Use Autoptimize or WP Super Minify.
- Shopify: Install a free app like “RocketCDN” or ask your developer to enable minification in the theme code.
- Use Browser Caching
- Caching keeps parts of your site stored on a visitor’s computer so repeat visits load faster.
- WordPress: W3 Total Cache or WP Rocket (both have free versions).
- Shopify: Most apps handle this automatically, but double-check via your app’s settings.
- Leverage a CDN (Content Delivery Network)
- A CDN stores copies of your images and files on servers around the world, serving them from the closest location to your visitor.
- Free option: Sign up for Cloudflare, point your domain to their nameservers, and turn on “Auto Minify” and “Caching.”
Quick check: After making changes, rerun your PageSpeed Insights test. Aim for a score above 80 on mobile and desktop—and a load time under 2 seconds for the best user experience.
Tip #21: Use HTTPS on Every Page
A secure site (HTTPS) protects your customers’ data and boosts your SEO. Here’s how to switch on HTTPS across your entire store:
- Check Your Current Setup
- In your browser, type
http://yourstore.comand see if it auto-redirects tohttps://. - If you already see a padlock icon next to your URL, you’re halfway there!
- In your browser, type
- Get an SSL Certificate
- Shopify: SSL comes built in—no setup needed.
- WooCommerce/WordPress:
- Many hosts (SiteGround, Bluehost) include free Let’s Encrypt certificates.
- Or install the “Really Simple SSL” plugin—it handles everything automatically.
- Force All Traffic to HTTPS
- Shopify: Enforced by default once SSL is active.
- WordPress/Other Hosts:
- In your site’s .htaccess file, add at the top:
RewriteEngine On
RewriteCond %{HTTPS} off
RewriteRule ^(.*)$ https://%{HTTP_HOST}%{REQUEST_URI} [L,R=301]- Or use your hosting control panel’s “Force HTTPS” toggle.
- Update Internal Links & Resources
- Search your templates for any hard-coded
http://links (images, scripts, CSS) and change them tohttps://. - Regenerate and resubmit your sitemap so Google sees all pages use HTTPS.
- Search your templates for any hard-coded
- Verify Everything Is Secure
- Browse a few pages and confirm the padlock shows—no “mixed content” warnings.
- In Google Search Console, add the
https://version of your site as a new property so you can track index status and errors.
Why it matters: HTTPS encrypts data (like payment details), builds customer trust, and is a confirmed ranking signal for Google—so it’s one of the simplest steps that pays off in both security and SEO.
Tip #22: Handle 404s & Redirects
When a shopper lands on a “Page Not Found,” they’re likely to leave—and Google sees it as a bad experience. Here’s how to fix broken links and guide both users and search engines to the right spot:
- Spot Broken Pages
- In Google Search Console, go to Coverage and look under Excluded for URLs marked “404.”
- Or click any link on your site—if it shows a browser 404 page, you’ve found a broken link.
- Create a Friendly 404 Page
- Design a simple “Oops, we can’t find that page” template with:
- A clear message (“Sorry, this page doesn’t exist”)
- A search box so visitors can look up what they need
- A link back to your homepage or main categories
- Design a simple “Oops, we can’t find that page” template with:
- Set Up 301 Redirects for Moved or Deleted Products
- Map any old URL (e.g., a discontinued product) to a new, relevant page—like a similar product or its category.
- This sends both users and Google straight to useful content instead of a dead end.
- How to Add Redirects in Your Platform
- Shopify:
- In your admin, go to Online Store → Navigation → URL Redirects.
- Click Create URL redirect, enter the broken URL in “Redirect from” and the new URL in “Redirect to,” then save.
- WordPress/WooCommerce:
- Install the free “Redirection” plugin.
- Go to Tools → Redirection, add the old URL and the target URL, and click Add Redirect.
- Shopify:
- Test Your Redirects
- After you create each redirect, paste the old URL into your browser and confirm it goes to the correct new page.
Why it matters: A helpful 404 page keeps visitors on your site, and proper 301 redirects preserve your SEO “points” so any links pointing to the old URL now benefit the new page. This simple cleanup can save lost sales and boost your rankings over time.
Tip #23: Publish Supporting Blog Content
Adding a simple blog alongside your store brings in extra visitors and gives you more places to use your keywords. Here’s how to start, even if you’ve never blogged before:
- Pick Helpful, Product-Related Topics
- Look at your keyword sheet’s Category and Product terms for ideas.
- Examples:
- “How to choose the perfect leather wallet”
- “5 must-have travel bags for your next trip”
- Keep Each Post Short & Sweet (300–500 Words)
- Too long can feel overwhelming—aim for quick reads.
- Use 3–5 headings (H2) to break up text and make it scannable.
- Use Your Keywords Naturally
- Put the main phrase in your blog title and first heading.
- Sprinkle it once or twice in the body—don’t force it.
- Link Back to Your Store
- In each post, add 2–3 links to relevant category or product pages using clear anchor text.
- Example: “Check out our men’s leather wallets for more styles.”
- These internal links help Google connect your blog to your shop.
- In each post, add 2–3 links to relevant category or product pages using clear anchor text.
- Add One Helpful Image
- Use a photo or graphic that matches the post (e.g., a flat-lay of wallets).
- Optimize it: rename to something like
how-to-choose-leather-wallet.jpgand add alt text.
- End with a Quick Call-to-Action
- Invite readers to shop or learn more:
- “Ready to find your perfect wallet? Browse our full wallet collection.”
- “Join our newsletter for more style tips and exclusive offers.”
- Invite readers to shop or learn more:
- Publish Regularly (Once a Month Minimum)
- Set a simple schedule—e.g., one post every two weeks.
- Consistency keeps Google coming back and gives readers a reason to return.
Why it works: Each blog post targets extra keywords and creates natural pathways into your shop. Over time, this builds authority, brings in free traffic, and makes your store feel more alive—without any heavy tech or big budget.
Tip #24: Earn Quality Backlinks
Backlinks are like votes from other trusted websites—Google sees them as a sign your store is reliable. Here’s a simple way to start getting them:
- Find Sites in Your Niche
- Search Google for blogs or sites that write about your products.
- Example:
best leather wallet blogs India
- Example:
- Make a list of 5–10 sites that look active and relevant.
- Search Google for blogs or sites that write about your products.
- Create Something They’ll Want to Share
- Write a short guide or infographic that solves a common problem.
- Example: “5 Simple Steps to Care for Your Leather Wallet”
- Make it easy to read (use bullets and images).
- Write a short guide or infographic that solves a common problem.
- Reach Out with a Friendly Email
- Email the blog owner or editor—keep it personal and brief: cssCopyEdit
Hi [Name],

I loved your recent post on wallet styles. I put together a quick guide on caring for leather wallets that your readers might find useful.

Would you be open to linking to it in your article or featuring it in a new post?

Thanks for considering!
[Your Name]
[Your Store Name & Link]- Mention something you genuinely liked on their site to show you’re not spamming.
- Offer to Guest Post
- Ask if you can write a short, free article (300–500 words) for their blog.
- Include one natural link back to your site in the author bio or content.
- Submit to Local & Industry Directories
- Find free directories in your area or niche (e.g., local business listings, craft/handmade directories).
- Add your store name, a short description, and your URL.
- Give Testimonials
- If you use a tool or service (like a shipping app or payment gateway), offer to write a testimonial.
- Many companies display customer quotes on their site with a link back to your store.
- Share & Promote Your Content
- Post your guides or infographics on social media and relevant forums.
- More visibility means more chances for other sites to find and link to you.
Why it matters: Every quality link tells Google “this site is useful”—boosting your SEO and sending extra visitors your way. With small, friendly steps like these, you’ll build authority without paying for ads or diving into technical campaigns.
Tip #25: Show Clear Shipping, Returns & Contact Info
Shoppers want to know exactly what to expect before they buy. Making your policies and contact details easy to find builds trust and cuts down on “where’s my order?” questions.
- Create Dedicated Pages
- Shipping Info: List your shipping methods, estimated delivery times (e.g., “Standard: 5–7 days”), and costs.
- Returns & Refunds: Explain your return window (“30 days”), how to start a return, and who pays return shipping.
- Contact Us: Include your email address, phone number, and a simple contact form.
- Use Clear Headings & Bullets
- On each page, break info into sections:
- Shipping Costs
- Delivery Times
- How to Track Your Order
- Under each heading, use 3–5 bullet points so readers get answers at a glance.
- On each page, break info into sections:
- Link from Everywhere
- Add these pages to your site footer under “Customer Service” or “Help.”
- On product pages, include a short note with links: “Free shipping on orders over ₹999. See our Shipping & Returns policy.”
- Keep Details Simple
- Avoid legal jargon—write as you’d explain to a friend.
- Example: “Want to return? Just email us within 30 days, and we’ll send you a free return label.”
- Add a Contact Form
- Use your platform’s built-in form or a free plugin/app so visitors can message you without leaving the page.
- Ask only for name, email, order number, and message to keep it quick.
- Update & Test Regularly
- Whenever you change carriers, rates, or policies, edit these pages right away.
- Click every link in your footer and product notes to make sure nothing breaks.
Why it matters: Clear shipping and return info reduces buyer hesitation and support emails, while an easy-to-find contact page shows you’re ready to help—boosting both sales and customer satisfaction.
Tip #26: Embed Short Product Demo Videos
Videos let shoppers see your product in action—and they’re easy to add even if you’ve never done it before.
- Record a Quick Demo (30–60 seconds)
- Use your phone to show the product in use: open it, point out features, and highlight one key benefit.
- Keep it steady and in good light—no fancy editing needed.
- Upload to YouTube
- Sign in to YouTube and click Upload.
- Give the video a clear title with your keyword (e.g., “Red Slim Leather Wallet Demo”).
- In the description, write one sentence about the product and add a link back to your product page.
- Get the Embed Code
- Under the video, click Share → Embed.
- Copy the
<iframe>code it shows you.
- Paste into Your Product Page
- Shopify:
- Open your product in the admin.
- Switch the description editor to HTML (click the
<>icon). - Paste the iframe code where you want the video to appear.
- WordPress:
- In your block editor, add a YouTube block (or Custom HTML).
- Paste the iframe or the raw video URL—WordPress will auto-embed it.
- Shopify:
- Position & Preview
- Save and view your product page to confirm the video appears and plays correctly.
- Move it higher or lower in the description if it feels out of place.
Why it helps: A real demo keeps shoppers on your page longer, answers questions faster than text, and can even show up in Google’s video search—giving you extra visibility without any extra cost.
Tip #27: Track Performance with Analytics & Search Console
Knowing what’s working (and what’s not) lets you focus on the moves that actually grow your store. Here’s how to set up and use these free Google tools in just a few steps:
- Set Up Google Analytics 4 (GA4)
- Shopify: In your admin, go to Online Store → Preferences, paste your GA4 Measurement ID under “Google Analytics,” and save.
- WordPress (WooCommerce): Install a plugin like “GA Google Analytics,” enter your GA4 ID (starts with
G-XXXXXXX), and activate it.
- Create Conversion Events
- In GA4, go to Events → Create event or use the built-in “purchase” and “add_to_cart” events.
- Mark “purchase” as a conversion so you can see which traffic turns into sales.
- Set Up Google Search Console
- Go to search.google.com/search-console and add your site’s
https://property. - Verify ownership via the recommended method (HTML tag or by using your Google Analytics account).
- Go to search.google.com/search-console and add your site’s
- Link GA4 & Search Console
- In GA4, navigate to Admin → Property Settings → Search Console Links, then follow the prompts to connect your verified Search Console property.
- Submit Your Sitemap
- In Search Console, under Index → Sitemaps, enter
sitemap.xmland hit Submit (we covered this in Tip #4).
- In Search Console, under Index → Sitemaps, enter
- Check Key Reports Weekly
- GA4: Look at Acquisition → Traffic Acquisition to see where visitors come from, and Monetization → E-commerce purchases for your sales data.
- Search Console: Under Performance, review top queries, pages, and countries. Note any big drops in clicks or impressions.
- Fix Coverages & Errors
- In Search Console’s Coverage report, find any pages with errors (like 404s or “noindex” issues) and correct them.
- Re-submit fixed pages to have Google re-crawl sooner.
Why it matters: Regularly checking these dashboards tells you which keywords and pages bring buyers, where you might have broken links, and how fast you’re growing. With this feedback loop, you can tweak your SEO and marketing in real time—no guesswork needed.
Tip #28: Block Low-Value Filter/Faceted Pages
Filter and sorting pages (like ?sort=price or ?color=red) often create dozens of near-duplicate URLs that don’t bring in new traffic—and can waste your crawl budget. Here’s how to keep them out of Google’s index:
- Identify Your Filter URLs
- Browse a category page and apply a filter or sort: you might see URLs like:
example.com/wallets?sort=price-asc
example.com/wallets?color=red- Note the patterns (
?sort=,?color=,?tag=, etc.).
- Block via robots.txt
- In your site’s
robots.txt(usually atexample.com/robots.txt), add lines like:
- In your site’s
User-agent: *
Disallow: /*?*sort=
Disallow: /*?*color=
Disallow: /*?*tag=- This tells search engines not to crawl any URL containing those parameters.
- Use
noindex,followfor Any You Can’t Block- If your platform doesn’t let you edit robots.txt, add to the page’s
<head>:
- If your platform doesn’t let you edit robots.txt, add to the page’s
<meta name="robots" content="noindex,follow">- “noindex” keeps it out of results; “follow” still lets Google crawl links on that page.
- Set Canonical URLs
- On filtered pages, add a canonical tag pointing back to the main category. This tells Google the original is the unfiltered URL.
<link rel="canonical" href="https://example.com/wallets" />- Test & Monitor
- In Google Search Console’s URL Inspection, check a sample filtered URL—it should show as “Blocked by robots.txt” or “Excluded by ‘noindex’ tag.”
- In Coverage, confirm you’re not seeing loads of filter URLs in the “Indexed” list.
Why it matters: By blocking these low-value URLs, you help Google focus on your real product and category pages—improving crawl efficiency, avoiding duplicate-content issues, and boosting the SEO power of your main pages.
Tip #29: Implement Pagination Properly
When your category list spills onto multiple pages (Page 1, Page 2, etc.), you need to help Google and shoppers move through them smoothly. Here’s how:
- Offer a “View All” Option (If It Makes Sense)
- If a category has under ~200 items, add a “Show All” link that displays every product on one page.
- Example link text: “View All Men’s Wallets”
- Why: A single page with all items is easiest for Google to crawl and for shoppers to scroll.
- Connect Pages with “prev”/“next” Tags
- In your theme’s HTML
<head>, tell Google which page comes before and after:<link rel="prev" href="https://example.com/wallets?page=1" /><link rel="next" href="https://example.com/wallets?page=3" />
- Many platforms add these automatically, but check your page source to be sure.
- In your theme’s HTML
- Keep Your Page URLs Consistent
- Use clear, predictable URLs like: bashCopyEdit
example.com/wallets?page=1 example.com/wallets?page=2 - Avoid random query strings or session IDs so Google can easily follow the sequence.
- Use clear, predictable URLs like: bashCopyEdit
- Test Your Pagination
- In Google Search Console’s URL Inspection, paste a page-2 URL and confirm it’s indexed and shows the
rel="prev"tag. - Click through the “View All” page (if you have one) to ensure it shows every product.
- In Google Search Console’s URL Inspection, paste a page-2 URL and confirm it’s indexed and shows the
Why it matters: Proper pagination prevents Google from ignoring pages 2, 3, and beyond. It also gives shoppers a clear path through your catalog—so no product gets left behind and you get the full SEO benefit of every page.
Tip #30: Refresh & Update Content Every 3–6 Months
Keeping your pages up-to-date shows Google your store is active—and fixes small issues before they hurt your rankings. Here’s how to make it a breeze:
- Set a Reminder
- Add a note to your calendar every 3–6 months to review key pages (homepage, top categories, best-selling products).
- Review Your Analytics
- In Google Analytics or Search Console, check which pages have:
- Dropping traffic or clicks
- Rising bounce rates
- Focus updates on those underperforming pages first.
- In Google Analytics or Search Console, check which pages have:
- Update Keywords & Meta Tags
- Re-open your keyword spreadsheet and see if search terms have shifted.
- Edit title tags, meta descriptions, and headings to include any new, relevant phrases.
- Refresh Product Details & Images
- Check product specs or pricing changes—edit descriptions accordingly.
- Replace any old photos with new, high-quality shots or updated demos.
- Add New FAQ Questions
- Look at recent customer questions and add them to your FAQ section to keep it fresh.
- Republish or “Push” Content
- After edits, republish the page or update its publish date so Google re-crawls it sooner.
- Share the updated page on social media or in your newsletter to attract fresh traffic.
Why it matters: Regular updates signal Google that your content is current and valuable, helping you maintain or improve your rankings—and giving shoppers the latest info they need to buy with confidence.
Tip #31: Write Keyword-Rich Category Descriptions
A short, targeted description on each category page helps Google understand the theme of that section—and gives shoppers a quick overview. Here’s how to add one:
- Choose Your Target Keywords
- From your “Category” group in your keyword sheet, pick 2–4 mid-tail phrases (e.g., “men’s leather wallets,” “slim leather wallets”).
- Write a 100–150-Word Intro
- Open with 1–2 sentences that describe the category’s purpose:
- Example: “Our men’s leather wallets combine classic style with modern features, giving you the perfect blend of form and function.”
- Naturally include your primary category keyword in the first sentence.
- Open with 1–2 sentences that describe the category’s purpose:
- Highlight Key Benefits in Bullets
- Below your intro, list 3–5 quick bullet points, each with a secondary keyword or benefit:
- “RFID protection to keep your cards safe”
- “Slim design fits front or back pocket”
- “Durable full-grain leather for everyday use”
- Below your intro, list 3–5 quick bullet points, each with a secondary keyword or benefit:
- Position It Strategically
- Place the description above your product grid so visitors and Google see it immediately.
- If space is tight, you can move it below the first row of products—but keep it on the same page.
- Keep It Unique & Updated
- Don’t copy the same text across multiple categories—each description should match its specific product group.
- Refresh once every 6 months to add seasonal keywords or new features.
Why it matters: A clear, keyword-rich category description boosts your chance to rank for those mid-tail searches, improves user engagement by setting expectations, and adds valuable content Google can crawl—without overwhelming new SEO learners.
Tip #32: Share Your Company Story
An authentic “About Us” page helps shoppers connect with your brand—and Google can surface it in “brand” searches. Here’s how to craft yours:
- Create a Dedicated About Us Page
- In your CMS, add a new page titled “About Us” or “Our Story.”
- Link it prominently in your main menu or footer.
- Tell Your Origin in 2–3 Short Paragraphs
- Explain how and why you started the business (“I began making leather wallets in my garage…”).
- Share your mission or values (“We believe in craftsmanship, sustainability, and lasting style.”).
- Use a Conversational, First-Person Tone
- Write as if you’re talking directly to a friend: use “I” or “we” and simple language.
- Avoid corporate jargon—keep it warm and relatable.
- Add Visuals & Team Photos
- Include 1–2 images: a founder shot, your workspace, or your team at work.
- Optimize each image with descriptive filenames (e.g.,
founder-portrait.jpg) and alt text.
- Optimize for SEO & Link Internally
- Sprinkle in one or two brand-related keywords (e.g., “handcrafted leather wallets” or your store name).
- Link from this page to your top-selling category or flagship product using clear anchor text.
Why it matters: A genuine company story builds trust, encourages brand searches, and gives Google extra content to display when people look up your business—turning casual visitors into loyal customers.
Tip #33: Highlight Special & Seasonal Offers
Seasonal deals and limited-time promotions grab attention—and can even earn you special badges in Google. Here’s how to showcase them simply:
- Create a Dedicated Offers Section
- On your homepage (or in a “Deals” menu), add a clear banner or block titled “Seasonal Offers” or “Diwali Sale.”
- Include 2–3 current promotions, each with a short headline (e.g., “30% Off All Wallets”) and dates.
- Design Eye-Catching Banners
- Use bright text and contrasting colors (within your brand’s style) to highlight the discount or deadline.
- Add a simple countdown timer (many free Shopify/WooCommerce apps exist) to show urgency.
- Add Deal Schema Markup
- Paste this JSON-LD into your homepage or promotion landing page
<head>:
- Paste this JSON-LD into your homepage or promotion landing page
<script type="application/ld+json">
{
  "@context": "https://schema.org",
  "@type": "Deal",
  "name": "Diwali Wallet Sale – 30% Off",
  "description": "Get 30% off all leather wallets during our Diwali sale!",
  "url": "https://example.com/deals/diwali-wallet-sale",
  "priceCurrency": "INR",
  "price": "899.00",
  "validFrom": "2025-10-15T00:00:00+05:30",
  "validThrough": "2025-10-31T23:59:59+05:30"
}
</script>
- Update
validFromandvalidThroughto match your actual sale dates.
- Sync Promotions in Merchant Center
- In Google Merchant Center, under Marketing → Promotions, click + to add a promotion.
- Fill in the sale details so your offers show directly in Shopping ads and free listings.
- Set Reminders to Update & Remove
- Add calendar alerts to start and end each promotion so outdated deals don’t linger.
- After a sale ends, remove or update the banner and schema so Google reflects the change.
Why it matters: Highlighting deals with clear visuals and Deal schema can earn you “sale” badges in search results and Shopping ads, drive urgency, and boost clicks—helping your store stand out during busy shopping seasons.
Tip #34: Claim & Optimize Your Google Business Profile
Having a complete, up-to-date Business Profile helps local shoppers find you—and gives you another spot in Google’s results. Here’s how to set it up:
- Claim Your Listing
- Go to business.google.com and sign in with your Google account.
- Search for your store name—if it appears, click Claim this business. If not, click Add your business and fill in the basic info.
- Verify Your Ownership
- Google will offer a postcard, phone call or email with a verification code.
- Enter the code in your Business Profile dashboard to unlock full editing rights.
- Fill Out All Business Details
- Name, Address & Phone (NAP): Must match exactly what’s on your website.
- Website URL: Add your homepage or a link to your “Store Locator” page.
- Business Category: Pick the most relevant (e.g., “Leather Goods Store,” “Fashion Accessories”).
- Hours: Set regular and holiday hours so shoppers know when you’re open.
- Add Photos & a Description
- Upload at least 5–10 images: storefront, products, team at work.
- Write a 100–150-word “From the Business” description that includes your main keyword (e.g., “handcrafted leather wallets”).
- Enable Messaging & Reviews
- Turn on Messaging so customers can ask quick questions right in Search or Maps.
- Encourage happy buyers to leave reviews—and reply promptly to both positive and negative feedback.
- Link to Merchant Center & Your Site
- In Merchant Center, under Settings → Business information, connect your Business Profile to show local inventory.
- On your website, add a “Find Us on Google” badge linking to your profile.
Why it matters: A fully optimized Business Profile boosts your visibility in local search and Maps, shows your address and hours at a glance, and lets you capture “near me” shoppers—driving more store visits and online clicks.
Tip #35: Upload Local-Inventory Data
Getting your in-store stock in front of nearby shoppers can boost both foot traffic and local online sales. Here’s how to share your physical inventory with Google:
- Verify Your Store Locations
- In Google Merchant Center, go to Business information → Stores and add each physical address with its own store_code.
- Make sure these match exactly what’s on your Google Business Profile.
- Create a Local-Inventory Feed
- In Merchant Center, navigate to Products → Feeds, then click + and choose Local inventory.
- Select your target country (e.g., India) and choose Google Sheets or Scheduled fetch as your feed method.
- Fill in Required Columns
- Use Google’s template (linked in Merchant Center) and include for each item:
id(your SKU)titlelink(product page URL)image_linkprice¤cyavailability(in stock/out of stock)quantity(number of units at that store)store_code(matches the store you verified)pickup_method(e.g.,in_store)
- Use Google’s template (linked in Merchant Center) and include for each item:
- Submit & Schedule Updates
- Once your sheet or file is ready, click Fetch now or Upload in Merchant Center.
- Set a daily or even hourly schedule so Google always has your latest stock levels.
- Enable Local Surfaces
- In Growth → Manage programs, opt in to Local inventory ads and Local storefront.
- This makes your products eligible to appear in Google Maps, “near me” searches, and local Shopping results.
- Monitor Diagnostics & Performance
- Check Products → Diagnostics for any feed errors or disapprovals—fix missing or invalid data.
- Under Performance, track clicks and impressions on local inventory to see which stores and products drive the most traffic.
Why it matters: By uploading your local-inventory data, your store’s in-stock products can show up when shoppers search “wallet store near me” or browse Google Maps—connecting nearby customers with your real-time stock and driving both online and in-person visits.
Tip #36: Add LocalBusiness & Organization Structured Data
Adding these snippets helps Google display your address, hours, logo, and social profiles right in search results—boosting trust and local visibility.
- Choose the Right Pages
- Organization schema goes on your homepage (site-wide).
- LocalBusiness schema goes on your Contact or Store Locator page (per physical location).
- Copy & Customize the Organization Snippet
- Paste this into your
<head>on the homepage:
- Paste this into your
<script type="application/ld+json">
{
  "@context": "https://schema.org",
  "@type": "Organization",
  "name": "Your Store Name",
  "url": "https://example.com",
  "logo": "https://example.com/images/logo.png",
  "sameAs": [
    "https://www.facebook.com/YourPage",
    "https://www.instagram.com/YourProfile"
  ],
  "contactPoint": [{
    "@type": "ContactPoint",
    "telephone": "+91-123-456-7890",
    "contactType": "customer service",
    "areaServed": "IN"
  }]
}
</script>
- Edit:
name,url, andlogoto match your site.sameAswith your social links.contactPointphone and type.
- Copy & Customize the LocalBusiness Snippet
- Paste this into your Contact page’s
<head>(or just before</body>):
- Paste this into your Contact page’s
<script type="application/ld+json">
{
  "@context": "https://schema.org",
  "@type": "LocalBusiness",
  "name": "Your Store Name",
  "image": "https://example.com/images/storefront.jpg",
  "address": {
    "@type": "PostalAddress",
    "streetAddress": "123 Main St",
    "addressLocality": "Mumbai",
    "addressRegion": "MH",
    "postalCode": "400001",
    "addressCountry": "IN"
  },
  "geo": {
    "@type": "GeoCoordinates",
    "latitude": "19.0760",
    "longitude": "72.8777"
  },
  "url": "https://example.com/contact",
  "telephone": "+91-123-456-7890",
  "openingHours": [
    "Mo-Fr 10:00-20:00",
    "Sa 10:00-18:00"
  ]
}
</script>- Edit:
addressfields to your location.geoif you have coordinates.openingHoursin “Day HH:MM-HH:MM” format.
- Add in Your CMS
- Shopify: In Online Store → Themes → Edit Code, paste snippets into
theme.liquidunder<head>. - WordPress: Use a header/footer plugin or edit your theme’s
header.phpbefore</head>.
- Shopify: In Online Store → Themes → Edit Code, paste snippets into
- Test & Validate
- Go to Google’s Rich Results Test and enter your page URL or paste the code to ensure no errors.
Why it matters: By marking up your organization and local business info, you help Google present your store details directly in search—making it easy for local customers to find you, see your hours, and get directions.
Tip #37: Use data-nosnippet Attributes
Sometimes you have on-page text you don’t want Google to pull into its search snippet—like lengthy disclaimers or promo code blocks. The data-nosnippet attribute lets you hide those parts so your search result stays focused.
- Identify Non-Essential Sections
- Find bits that aren’t important for the search snippet: long legal text, internal notes, or repeated boilerplate.
- Add
data-nosnippetto Your HTML- Wrap the element you want to hide with the attribute. For example:
<div data-nosnippet>
  *Terms and conditions apply. See full policy on our Returns page.*
</div>
- You can use it on
<p>,<div>, or other block elements.
- Test Your Changes
- In your live page, view source to confirm the attribute is present.
- Use the URL Inspection tool in Search Console to see which text Google would show in the snippet—your hidden text should be excluded.
- Use Sparingly
- Only hide genuinely non-helpful text; you still want Google to see and index the rest of your content.
Why it matters: By hiding the right parts, you ensure Google’s auto-generated snippet highlights your most compelling copy—like product benefits or offers—so shoppers get the key info at a glance.
Tip #38: Include VideoObject Schema
If you embed product demos or how-to clips, adding VideoObject markup helps Google understand and feature your video in rich results (sometimes with a video thumbnail right in search).
- Prepare Your Video Details
- Gather:
- Title (e.g., “Red Slim Wallet Demo”)
- Description (one-sentence summary)
- Thumbnail URL
- Upload date (
YYYY-MM-DD) - Duration (
PT1M30Sfor 1 minute 30 seconds) - Embed URL (YouTube or your player link)
- Gather:
- Add the JSON-LD Snippet
- Paste this into your page’s
<head>or just before</body>:
- Paste this into your page’s
<script type="application/ld+json">
{
  "@context": "https://schema.org",
  "@type": "VideoObject",
  "name": "Red Slim Wallet Demo",
  "description": "Watch a quick demo of our red slim leather wallet showing its features.",
  "thumbnailUrl": "https://example.com/images/wallet-demo-thumb.jpg",
  "uploadDate": "2025-03-01",
  "duration": "PT0M45S",
  "embedUrl": "https://www.youtube.com/embed/VIDEO_ID"
}
</script>
- Customize & Validate
- Replace placeholders with your actual URLs and data.
- Run the page through Google’s Rich Results Test to confirm the VideoObject is detected.
- Place It Near the Video
- Although
<head>works, placing it right before the video embed can help keep your code organized.
- Although
Why it matters: With VideoObject markup, your embedded demos can appear as clickable video snippets—complete with thumbnails—in search results, driving higher engagement and more clicks to your site.
Tip #39: Ensure Each Product Variant Has Its Own URL
When your product comes in different colors, sizes, or styles, give each option its own web address so Google and shoppers can land exactly where they want. Here’s how:
- Check Your Platform’s Variant Links
- Shopify: Variant URLs work out of the box. On a product page preview, switch colors or sizes and watch the URL update with
?variant=at the end. - Other Platforms: If selecting a variant doesn’t change the URL, install a free URL/Permalink plugin or ask your developer to enable unique variant links.
- Shopify: Variant URLs work out of the box. On a product page preview, switch colors or sizes and watch the URL update with
- Test Each Variant URL
- Open a product page and pick a different option (e.g., blue instead of red).
- Copy the browser’s address bar and paste into a new tab—make sure it shows that specific variant.
- Use Variant URLs in Your Links
- When you share a color or size on social media, email, or blog posts, link directly to the variant URL so visitors skip the extra clicks.
- Ensure Google Can Crawl Them
- Double-check that variant URLs aren’t blocked by
noindexor yourrobots.txt. - In Search Console’s URL Inspection, enter a variant URL to confirm it’s indexed.
- Double-check that variant URLs aren’t blocked by
Why it matters: Unique variant URLs let customers and search engines find the exact product option instantly—boosting user experience, reducing clicks, and improving your SEO performance.
Tip #40: Leverage Internal Site Search Data
Your site’s search bar is a goldmine of real user questions—use it to find new keywords and improve pages. Here’s how:
- Turn On Search Tracking
- In Google Analytics 4, go to Admin → Data Streams → Enhanced Measurement and enable “Site search.”
- If your platform has built-in search analytics (Shopify, Magento), make sure it’s active.
- Review Top Search Queries
- In GA4, navigate to Engagement → Events → view_search_results to see what people are typing.
- Note the most common terms and any misspellings or synonyms.
- Identify No-Result Searches
- Look for queries that return zero results—these reveal content gaps (e.g., “women’s bifold RFID wallet” if you don’t have that listed).
- Create or Update Pages
- For high-volume searches, add or optimize pages:
- Write a brief product or category page for the missing term.
- Add the exact phrase in the title, heading, and meta description.
- For high-volume searches, add or optimize pages:
- Fix the Search Experience
- Use plugins or settings to add synonyms and common misspellings so shoppers always find relevant items.
- Example: Map “sun cream” to “sunscreen” to avoid “no results”.
Why it works: Internal search data shows exactly what your customers want. By using those terms on your pages—and fixing failed searches—you satisfy real needs, capture extra traffic, and boost conversions without guesswork.
That wraps up our 40 essential SEO tips for your ecommerce site. Whether you’re tweaking your URLs, adding structured data, or refreshing your content, each step moves you closer to more traffic and sales. Below is the “best at a glance” infographic to help you quickly compare ecommerce platforms when you’re choosing where to build your store:
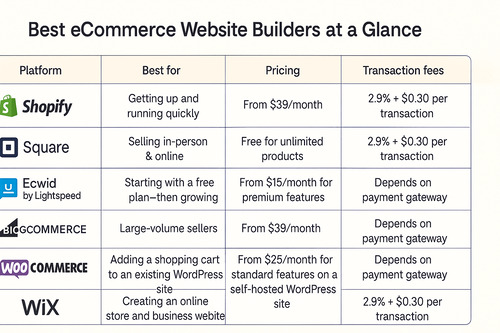
And don’t forget to download your free SEO checklist—an Excel file that lays out every step in this guide so you can mark them off as you go. Here’s to smarter optimization and real growth for your store!